소개
Cinemachine을 활용한 TPS 캐릭터 카메라 만들기
준비물: Input System, Cinemachine
코드
필요한 스크립트는 3개 정도이다.
- 사용자 입력: PlayerController.cs
- 캐릭터 조종: PlayerMovement.cs
- 카메라 조종: PlayerCamera.cs
Input Action은 다음 사진과 같이 만들어준다. 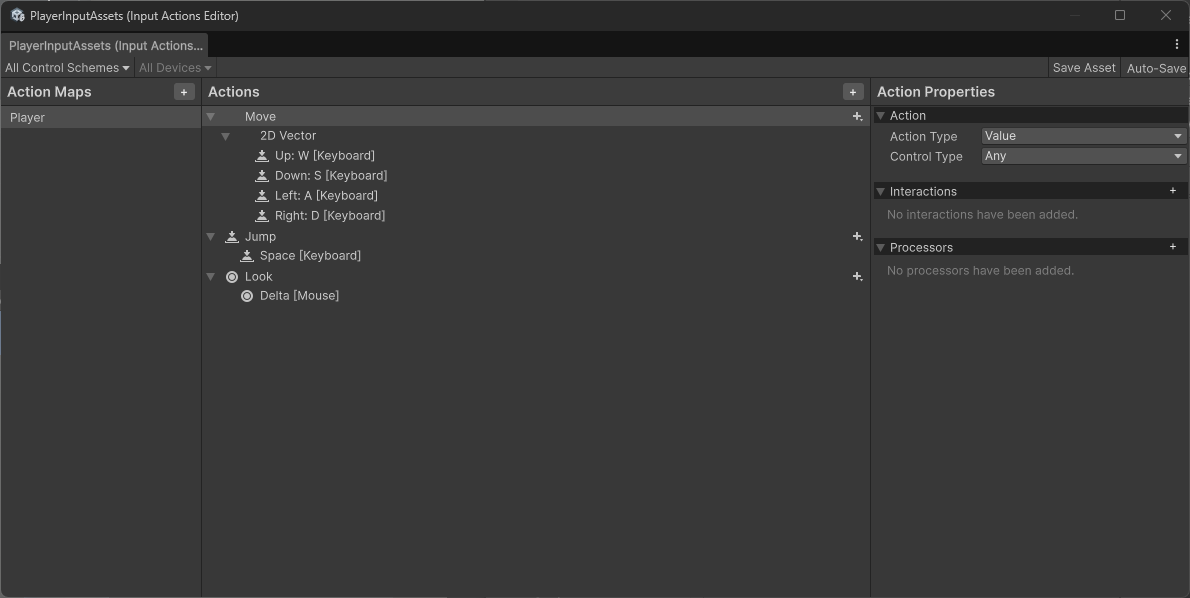
PlayerController.cs
사용자의 입력을 받아서 처리한다.
using UnityEngine;
using UnityEngine.InputSystem;

public class PlayerController : MonoBehaviour
{
    private PlayerMovement playerMovement;
    private PlayerCamera playerCamera;

    void Awake()
    {
        playerMovement = GetComponent<PlayerMovement>();
        playerCamera = GetComponentInChildren<PlayerCamera>();
    }

    void Start()
    {
        Cursor.visible = false;
        Cursor.lockState = CursorLockMode.Locked;
    }

    public void OnMove(InputAction.CallbackContext context)
    {
        playerMovement.MoveInput = context.ReadValue<Vector2>();
    }

    public void OnJump(InputAction.CallbackContext context)
    {
        if (context.performed)
        {
            playerMovement.Jump();
        }
    }

    public void OnLook(InputAction.CallbackContext context)
    {
        playerCamera.LookInput = context.ReadValue<Vector2>();
    }
}
PlayerMovement.cs
움직임은 CharacterController 컴포넌트를 사용한다.
Unity Documentation에서 코드를 가져왔다.
WARNING
playerVelocity.y 를 -2로 하는 이유는 땅에 확실히 닿게 하여 바로 점프할 수 있도록 하기 위함이다.
0으로 하면 열에 여덟은 점프가 안 먹는다.
using UnityEngine;
using UnityEngine.InputSystem;

[RequireComponent(typeof(CharacterController))]
public class PlayerMovement : MonoBehaviour
{
    private CharacterController controller;
    private Vector3 playerVelocity;
    public Vector2 MoveInput { get; set; }
    public Vector2 LookInput { get; set; }
    private bool isGround;
    [SerializeField]
    private float playerSpeed = 2.0f;
    [SerializeField]
    private float jumpHeight = 1.0f;
    [SerializeField]
    private float gravityValue = -9.81f;
    public Transform cameraTransform;

    private void Start()
    {
        controller = GetComponent<CharacterController>();
    }

    void Update()
    {
        isGround = controller.isGrounded;
        if (isGround && playerVelocity.y < 0)
        {
            playerVelocity.y = -2f;
        }

        playerVelocity.y += gravityValue * Time.deltaTime;

        Move();
    }

    public void Move()
    {
        Vector3 flatForward = Vector3.Normalize(new Vector3(cameraTransform.forward.x, 0, cameraTransform.forward.z));
        Vector3 flatRight = Vector3.Cross(Vector3.up, flatForward);
        Vector3 moveDirection = (flatForward * MoveInput.y) + (flatRight * MoveInput.x);

        if (moveDirection.magnitude > 1f)
        {
            moveDirection.Normalize();
        }

        Vector3 horizontalMovement = moveDirection * playerSpeed;

        Vector3 finalMovement = new Vector3(
            horizontalMovement.x,
            playerVelocity.y,
            horizontalMovement.z
        );

        controller.Move(finalMovement * Time.deltaTime);
    }

    public void Jump()
    {
        if (isGround)
        {
            playerVelocity.y = Mathf.Sqrt(jumpHeight * -2.0f * gravityValue);
        }
    }
}
PlayerCamera.cs
마우스 입력을 통해 회전한다.
mouseX(좌, 우)는 캐릭터의 y축(YAW) 회전을 맡고,
mouseY(상, 하)는 카메라의 x축(PITCH) 회전을 맡는다.
이를 위해 cameraTransform 변수에 Camera Rig가 필요하다.
WARNING
마우스를 좌, 우로 움직이면 캐릭터가 y축(YAW) 회전하고,
위, 아래로 움직이면 카메라만 x축(PITCH) 회전해야 한다.
using UnityEngine;

public class PlayerCamera : MonoBehaviour
{
    public Vector2 LookInput { get; set; }

    [SerializeField]
    private float rotationSpeed = 100f;
    private float rotationX = 0f;
    [SerializeField]
    private float rotationLimit = 80f;
    public Transform cameraTransform;
    void Update()
    {
        Look();
    }

    private void Look()
    {
        float mouseX = LookInput.x * rotationSpeed * Time.deltaTime;
        transform.Rotate(Vector3.up * mouseX);

        float mouseY = LookInput.y * rotationSpeed * Time.deltaTime;
        rotationX -= mouseY;
        rotationX = Mathf.Clamp(rotationX, -rotationLimit, rotationLimit);
        cameraTransform.transform.localRotation = Quaternion.Euler(rotationX, 0f, 0f);
    }
}
시네머신 카메라
MainCamera에 'Cinemachine Brain' 컴포넌트를 부착해주고,
캐릭터가 될 게임 오브젝트의 자식 오브젝트로 Cinemachine Camera를 부착한다.
Cinemachine Camera 설정은 아래 사진처럼 해준다.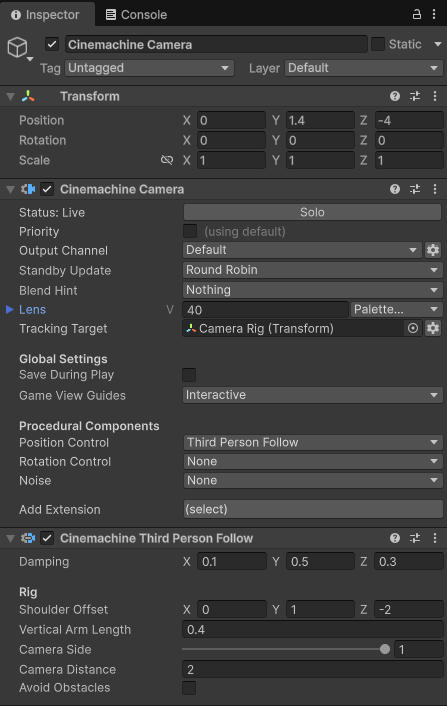
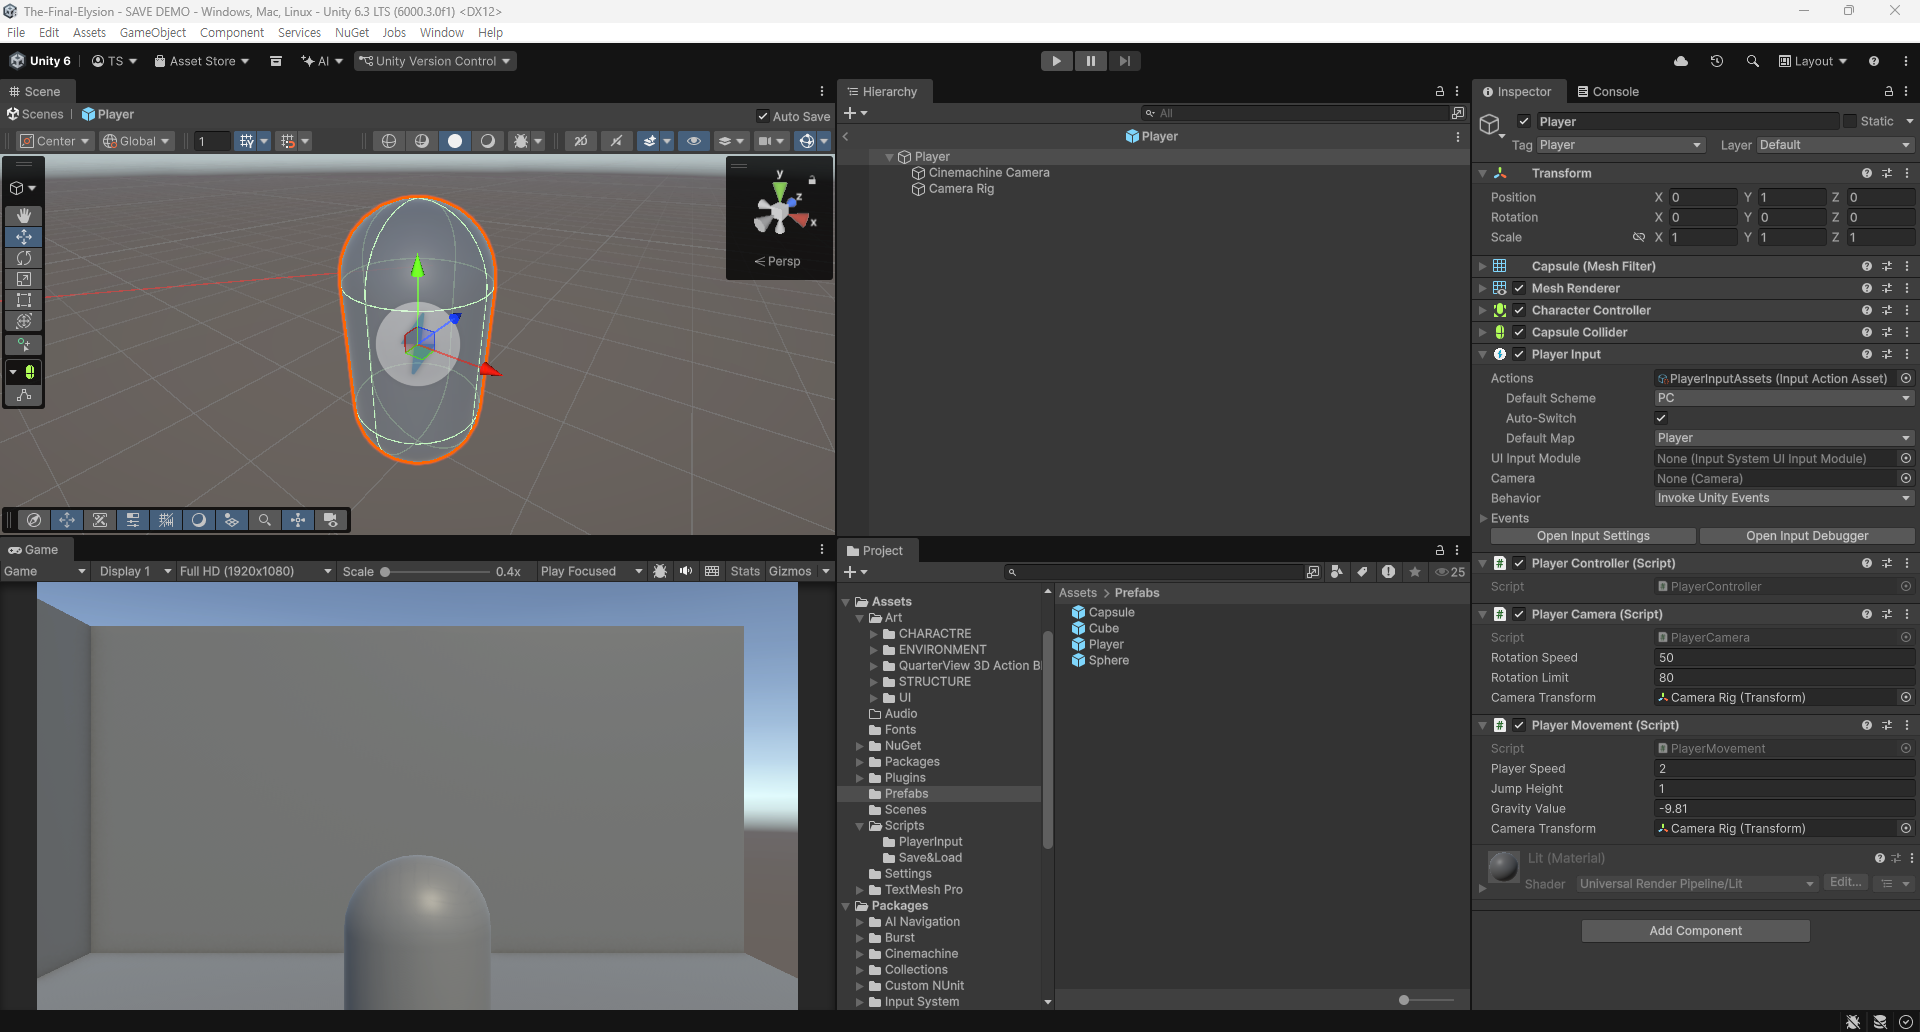
계층 구조
Camera Rig는 아무것도 없는 빈 게임 오브젝트이다.
이름 그대로 시네머신 카메라가 바라보는 대상이다.
INFO
Cinemachine Camera, PlayerCamera.cs 및 PlayerMovement.cs 들이 참조하는 Camera Transform 은 Camera Rig 이다.
마무리